How to set sag on a motocross or enduro bike
How to measure and set race sag and static sag on a motocross or enduro bike: tools, measuring step by step, good sag values and how to tell if the spring is wrong.
Sag is one of the most important settings on a motocross or enduro bike. Before you start turning clickers, changing springs or suspecting the valving, make sure the bike sits at the right height. Correct sag directly affects balance, turning, traction and stability.
01 What does sag mean?
Sag is how much the suspension compresses under the weight of the bike and the rider. In practice it decides at what height the bike runs while you ride.
If the sag is off, the geometry of the whole bike changes. It affects how much weight sits on the front and the rear, how the bike turns into a corner, how stable it feels on a straight and how well the rear tyre grips under acceleration.
02 Race sag and static sag
Two values are used when setting sag: race sag (rider sag) and static sag (free sag). Both are measured between the same points, but they tell you different things about the suspension.
Race sag is the sag with the rider on board, measured in full riding gear in a normal riding position. It is the most important value for how the bike handles.
Static sag is the sag under the weight of the bike alone. It helps you judge whether the rear spring rate suits the rider.
03 Why is sag so important?
Sag sets the basic attitude of the bike. If the rear sits too low, the bike can feel lazy to turn. If the rear sits too high, the bike can get nervous and unsettled.
Correct sag lets the bike work the way it was designed. The front and rear stay better balanced, the rear tyre follows the ground better and the rider can ride more relaxed.
- The bike turns more predictably.
- Rear traction improves.
- The front and rear work in better balance.
- The suspension uses its travel more sensibly.
- The rider gets less tired.
Do not start with the clickers
Clickers are for fine-tuning. If the sag is clearly off, it is easy to use the clickers to fix the wrong problem. So measure and set sag first.
04 What you need
Measuring sag does not need special tools, but take care when you measure. Even a small measuring error can shift the result by several millimetres.
- A tape measure or a dedicated sag gauge
- A bike stand
- A helper to take the measurements
- Your riding gear: helmet, boots, protection and riding kit
- A pen, phone or paper to note the values
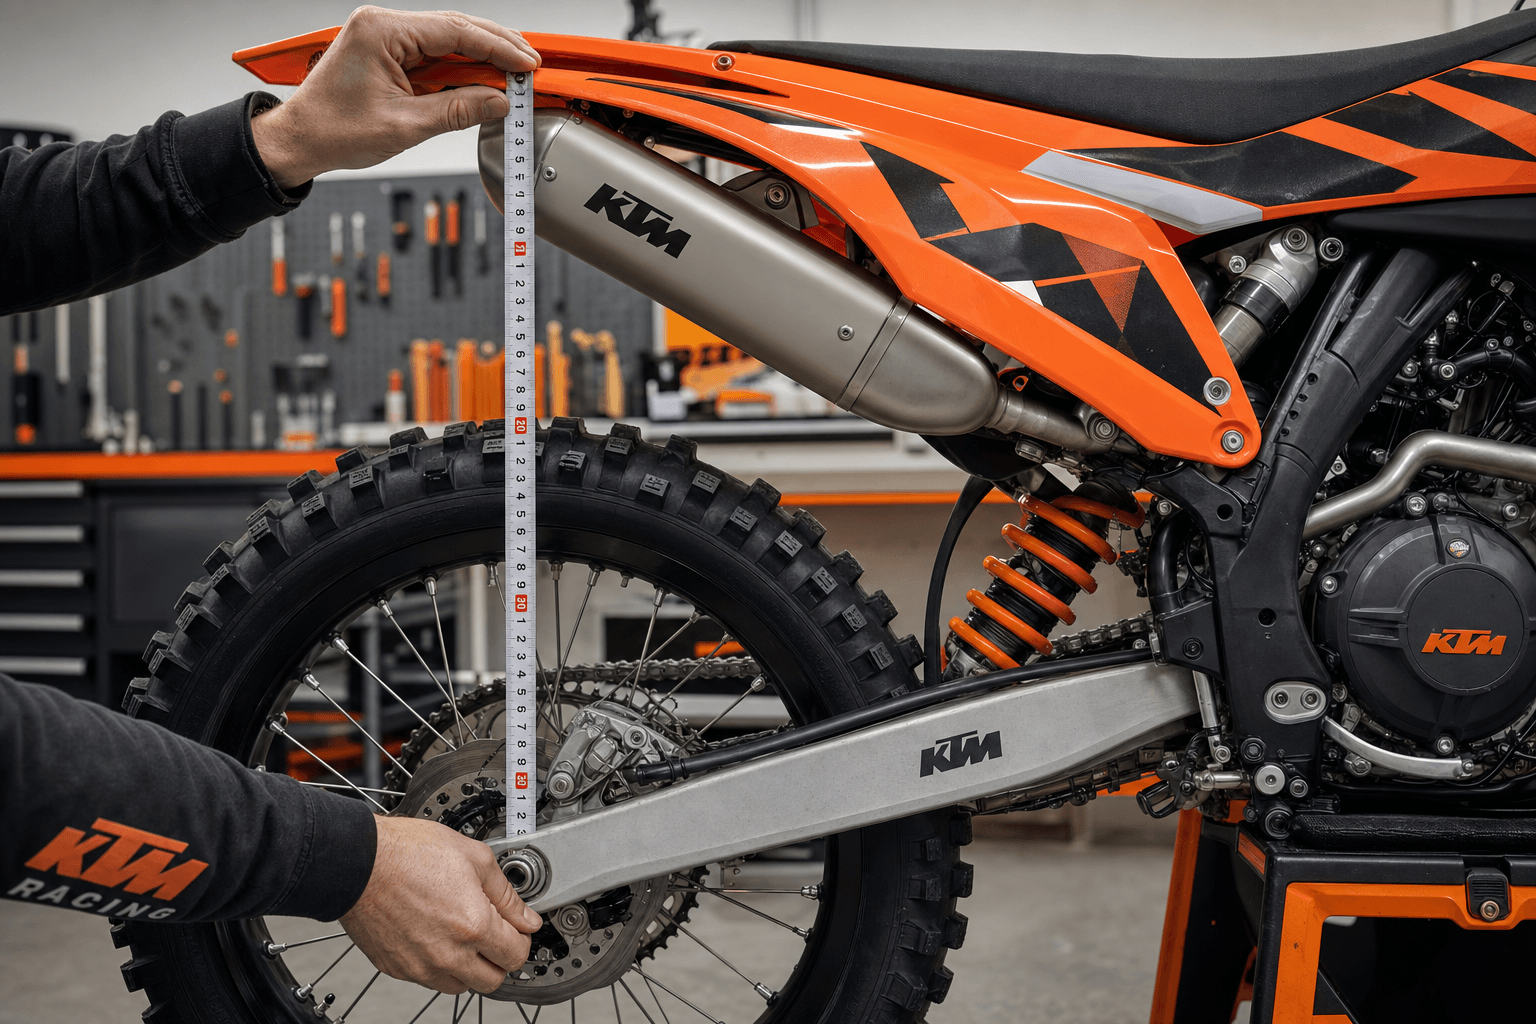
Pick a clear measuring point. Rear sag is usually measured from the rear axle straight up to the edge of the rear fender, a piece of tape or another fixed point. What matters most is using the same point for every measurement.
05 How to measure sag step by step
Steps
- Put the bike on a stand so the rear wheel is off the ground and the suspension is fully extended.
- Measure from the rear axle to your measuring point. This is L1.
- Take the bike off the stand and let it stand under its own weight without a rider.
- Bounce the suspension lightly and let the bike settle naturally.
- Measure the same distance again. This is L2.
- Put on your riding gear and get on the bike in a normal riding position.
- Keep your feet on the pegs and let your helper hold the bike upright.
- Bounce the suspension lightly and let the bike settle.
- Measure the same distance a third time. This is L3.
- Work out race sag and static sag with the sag calculator.
06 Sag calculator
Enter your three measurements in millimetres in our sag calculator. It works out race sag and static sag for the front and the rear, explains what the values mean on the bike and gives adjustment tips.
07 Good sag values
Always check the exact recommendations in the owner’s manual of your bike. The values below are common starting points for motocross and enduro bikes.
In motocross you usually want precise turning, good support and stability for jumps and braking bumps. In enduro the sag can be used a little differently, because traction, rocks, roots and comfort matter more.
These are not absolute truths. The bike model, how the linkage or PDS works, the weight of the rider, riding style and the other suspension settings all affect the final target.
08 How do you adjust sag?
Rear sag is adjusted by changing the preload on the rear spring. Tightening the spring raises the rear and reduces race sag. Loosening the spring lowers the rear and increases race sag.
- More preload → less race sag → the rear rises.
- Less preload → more race sag → the rear drops.
- Adjust a little at a time and measure again.
- Write the values down so you know which way a change took you.
09 How do you know the spring rate is wrong?
Measuring sag tells you a lot about whether the rear spring suits you. If you can get race sag right but static sag is clearly off, adjusting preload alone may not be enough.
If you only reach the right race sag with a lot of preload, the spring may be too soft. The numbers then put the bike at the right height, but the spring may not be working in its best range.
If you reach the right race sag with almost no preload and the bike sinks too much under its own weight, the spring may be too stiff. The bike then may not use its travel properly and the rear can feel harsh or short of grip.
A wrong spring cannot be fixed with clickers
Clickers change the damping, not the spring rate. If the spring is clearly wrong for the weight of the rider, you cannot get the sag right with clickers alone.
10 What does wrong sag feel like on the bike?
Too much or too little sag changes how the bike behaves. Riders often notice the problem as a feeling without linking it to sag.
Too much race sag
- The rear sits too low.
- The front gets light and the bike can turn slowly.
- The bike can feel heavy in corners.
- Less travel is left for hits.
Too little race sag
- The rear sits too high.
- The front can get nervous.
- The bike can feel unsettled on straights and under braking.
- Traction can drop because the rear tyre does not follow the ground calmly.
11 The most common sag mistakes
- Measuring without riding gear.
- The rider sits in the wrong position during the measurement.
- The measuring point changes between measurements.
- The bike is not bounced and allowed to settle before measuring.
- The chain is too tight and affects the rear suspension movement.
- Changing preload too much at once.
- Trying to fix a wrong spring with the clickers.
A good measurement is repeatable. If you measure the same thing three times and get a different result every time, fix the way you measure before you adjust anything.
12 When should you check sag again?
Sag is not something you set once and forget. Check it whenever something changes on the bike, the rider or the riding gear.
- When you buy a new bike.
- When you change the rear spring.
- When your weight changes.
- When you change your riding gear significantly.
- After a suspension service.
- When the bike starts to feel different than before.
- Before a race season or an important event.
13 Summary
Sag is the foundation of suspension setup. It sets the height, balance and geometry of the bike. If the sag is off, the bike can feel unsettled, heavy, short of grip or hard to turn.
Once race sag and static sag are in a sensible range, the other settings start to make sense. Measure sag before the clickers, before bigger changes and whenever the behaviour of the bike puzzles you.
Cannot get the sag right?
TTM Factory helps you choose the right spring, set the sag and service your suspension. We service and set up WP, KYB, Showa and Öhlins suspension at a professional level.